Friday 18 May 2018

How to Create Joomla Menus

How to Create Menus in Joomla.?

Create Menus

Here are a few simple steps to create menus in Joomla.
Step (1) − Click MenusMenu ManagerAdd New Menu

Step (2)After clicking on Add New Menu, the Menu Manager − Add Menu page will display.

Here, we can add Menu Title (Name), Type and Description.
  • Menu Title(Name) − It should indicate the Title( Name ) of the menu.
  • Menu Type − The name of the menu type.
  • Description − Description about the menu.

    Step (3) − After filling all the information about menu, click on Save button. It saves the menu bar you created.
    Step (4) − We can also click on Save & Close button. It saves the menu bar and then closes the present screen.

    Step (5) − When we click on Save & New button, your menu is saved and it opens a new create menu.

Wednesday 2 May 2018

Paragraph Tag in HTML

Paragraph Tag

The <p> tag offers a way to structure your text into different paragraphs. Each paragraph of text should go in between an opening <p> and a closing </p> tag as shown below in the example −

Example

<!DOCTYPE html>
<html>

   <head>
      <title>Paragraph Example</title>
   </head>
 
   <body>
      <p>Here is a first paragraph of text.</p>
      <p>Here is a second paragraph of text.</p>
      <p>Here is a third paragraph of text.</p>
   </body>
 
</html>

This will produce the following result −
Here is a first paragraph of text.
Here is a second paragraph of text.
Here is a third paragraph of text.

Heading Tags HTML Basic Tags

Heading Tags

Any document starts with a heading. You can use different sizes for your headings. HTML also has six levels of headings, which use the elements <h1>, <h2>, <h3>, <h4>, <h5>, and <h6>. While displaying any heading, browser adds one line before and one line after that heading.

Example


<!DOCTYPE html>
<html>

   <head>
      <title>Heading Example</title>
   </head>
 
   <body>
      <h1>This is heading 1</h1>
      <h2>This is heading 2</h2>
      <h3>This is heading 3</h3>
      <h4>This is heading 4</h4>
      <h5>This is heading 5</h5>
      <h6>This is heading 6</h6>
   </body>
 
</html>

This will produce the following result −

This is heading 1

This is heading 2

This is heading 3

This is heading 4

This is heading 5
This is heading 6

what is HTML

HTML stands for Hypertext Markup Language, and it is the most widely used language to write Web Pages.
  • Hypertext refers to the way in which Web pages (HTML documents) are linked together. Thus, the link available on a webpage is called Hypertext.
  • As its name suggests, HTML is a Markup Language which means you use HTML to simply "mark-up" a text document with tags that tell a Web browser how to structure it to display.

Originally, HTML was developed with the intent of defining the structure of documents like headings, paragraphs, lists, and so forth to facilitate the sharing of scientific information between researchers.
Now, HTML is being widely used to format web pages with the help of different tags available in HTML language.

Joomla Extensions Menu

Click on Extensions, a dropdown menu as shown below will be displayed


Extension Manager

Extension Manager is used to extend the functionality of Joomla website.
Click ExtensionsExtension Manager, a screen as shown below will get displayed


Module Manager

It manages the modules that are installed on the site i.e. the location and function of modules.
Click ExtensionsModule Manager, a screen as shown below will get displayed.

Plugin Manager

It manages the Joomla plugins and allows to enable/disable or edit the details of plugins.
Click ExtensionsPlugin Manager, a screen as shown below will get displayed.

Template Manager

It manages the designs that are used in the website. The templates can be implemented without changing the content structure within a few seconds.
Click ExtensionsTemplate Manager, a screen as shown below will get displayed −


Language Manager

This helps you set a default language for your site.
Click ExtensionsLanguage Manager, a screen as shown below will get displayed.

Tuesday 1 May 2018

Joomla Components Menu

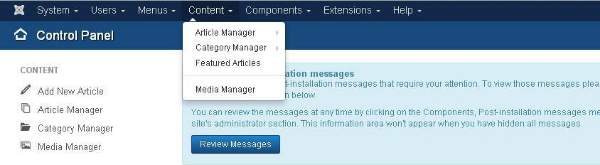
Click on Components Menu, a dropdown menu as shown below will be displayed.

Banners

ComponentsBanners are used to setup the banners on the website. When you click on Banners, you see a submenu as shown below −
Let us study each of the submenu as follows −

Banners

It is used to edit or add banners in the Joomla website to display.
Click ComponentsBannersBanners, a screen as shown below will get displayed.

Categories

With Category Manager you can create new banner categories or edit the existing banner categories.
Click ComponentsBannersCategories, a screen as shown below will get displayed.

Under the Category Manager - Banner page.
  • Checkbox − It is used to select one or more category items by clicking on the box.
  • Status − Specifies the status of the category i.e. Publish/Unpublish.
  • Title − Specifies the name of the title in the category.
  • Access − Specifies the access level, i.e. public or private.
  • Language − Specifies the item language used.
  • ID − It is the unique identification number assigned to the items automatically.
The Search box in the Category manager - Banners page is used to search the category items very easily.
You can search the item in the article manager page by selecting any of the following ways i.e. through Select Status, Select Max Levels, Select Access, Select language or Select Tag.

Clients

With Client Manager you can create a new client banner or edit the existing ones.
Click ComponentsBannersClients, a screen as shown below will get displayed.
Below, we have mentioned the details about the column header present in the Banner Manager − Clients page.
  • Checkbox − It is used to select one or more clients by clicking on the box.
  • Status − Specifies the status of the category i.e. Publish/Unpublish.
  • Client − Specifies the name of the Banner clients.
  • Contact − Specifies Contact information of the client.
  • Banners − Specifies the number of banners defined for this client.
  • Purchase Type − It indicates how the clients are purchasing the banners i.e. Yearly or Monthly. By default it is monthly.
  • ID − It is the unique identification number assigned to the items automatically.
The Search box in the Banner Manager− Clients page is used to search the client items very easily.
You can search the item on the Client Banners page by selecting the Status or Type.

Tracks

In Tracks, you can view the tracking information for a list of existing banners.
Click ComponentsBannersTracks, a screen as shown below will get displayed.

The Begin Date and End date is used to track the information of the banner within a particular period (For instance, consider begin date as 2015-07-06 and end date as 2015-07-10, within this period of time the banner information will get tracked).

Toolbars

  • Export − It exports the banner tracking information in the CSV file.
  • Delete Tracks − Deletes the information of the selected tracks.

Contacts

It adds contact information of client on Joomla site such as name, address, telephone number, email etc.
Click ComponentsContactsContacts, a screen as shown below will get displayed.

Joomla Update

It specifies the Joomla latest version which is being used.
Click ComponentsJoomla! Update, a screen as shown below will get displayed.

Messaging

ComponentsMessaging allows sending and reading messages in Joomla. When you click on Messaging, you see a submenu as shown below.

New Private Message

It is used to send messages to the other backend of Joomla site. You can read, write or delete the messages.
Click ComponentsMessagingNew Private Message, a New Private Message page opens up.

 Read Private Messages

In this section, you can read all the private messages.
Click on ComponentsMessagingRead Private Message, a screen as shown below will get displayed.

Toolbars

Below, we have mentioned details about the toolbars present in Read Private Message.
  • New − Creates a new message.
  • Mark as Read − Marks the messages as read from this section.
  • Mark as Unread − It marks the messages which have not been read yet.
  • Trash − It deletes the messages permanently.
  • My Settings − It is used to set the messages i.e. Lock the inbox, email a new message and auto-purge the message.

Newsfeeds

It allows adding news feed on your Joomla site from other sites.
Click ComponentsNewsfeedsFeeds, a Newsfeeds page will open.

Post-installation Messages

It allows reviewing actionable messages after installation.
Click ComponentsPost Installation Messages, a screen as shown below will get displayed.
Here it delivers messages after successful installation of Joomla extension or core.

Redirect

Redirect Manager is used to redirect the URL's that do not exist on the website with web pages that are working.
Click ComponentsRedirect, a screen as shown below will get displayed.
The details about the column header present in the Redirect Manager page are mentioned below.
  • Checkbox − It is used to select one or more items by clicking on the box.
  • Expired URL − The URL is redirected towards the website.
  • New URL − Redirects the designated URL.
  • Referring Page − Redirects the referring web pages.
  • Created Date − Specifies the date the URL was created.
  • 404 Hits − The pages were not forwarded after making the number of requests.
  • ID − It is the unique identification number assigned to the items automatically.

Toolbars

Below, we have mentioned details about the toolbars present on Redirect page.
  • New − Creates a new Redirect URL.
  • Edit − Edits the selected redirect.
  • Enable − It makes available the selected redirect to use.
  • Disable − It makes unavailable the selected redirect to use.
  • Archive − It can change the status of the selected redirect to published or unpublished by selecting archived in the select status filter.
  • Trash − It changes the status of the selected redirect to trash.

Search

Search Manager allows you to see how many searches were done for each key combination and what was the result for each search.
Click ComponentsSearch, a screen as shown below will get displayed.

Smart Search

It enhances site search.
Click ComponentsSmart Search, a screen as shown below will get displayed.


Below, we have mentioned the details about the column header present in the Smart Search page.
  • Checkbox − It is used to select one or more items by clicking on the box.
  • Status − Specifies the status of the items i.e. Publish/Unpublish.
  • Title − Specifies the name of the title.
  • Type − Specifies the type of the page i.e. Article or Tag.
  • Last Updated − Specifies the date of the last modification.

Tags

It is used to display the list of the tagged pages.
Click ComponentsTags, a screen as shown below will get displayed.

Weblinks

The link resource is provided very easily for user of the site and can be sorted into categories. It is used to add, edit or delete the links to other website on your Joomla.
Click ComponentsWeblinksLinks, Weblinks page will get open.

Joomla Content Menu

A drop-down menu is displayed when you click on Content Menu.  

Article Manager

In Article Manager, you can create the standard pages that consist of images, text and hyperlinks. Click on ContentArticle Manager menu on Joomla administrative panel,

Here, we have mentioned the details about the column header present on the Article Manager page.

  • Checkbox − It is used to select one or more items.
  • Status − specifies the status of the page or article, i.e., Publish/Unpublish/Archieve/trashed.
  • Title − Specifies the name of the title that will be displayed in the menu.
  • Access − Specifies the access level, i.e. public or private.
  • Author − This is the author name who has created that particular item.
  • Language − Specifies the item language used.
  • Date − Specifies the article creation date.
  • Hits − Specifies the number of times the item was viewed.
  • ID − It is the unique identification number assigned to the items automatically.
Let us learn about the Search box in the article manager page which is used to search the items very easily.
Here you can search the item in the article manager page by selecting any of these − Select Status, Select category, Select Max Levels, Select Access, Select Author, Select language or Select Tag.

Add New Article

Click on ContentArticle ManagerAdd New Article menu on the Joomla administrative panel, then you will get the following screen. The same page can be viewed when you click on Category ManagerAdd New Category

Here you can create your article or web page by specifying the title in Title bar and we can add or write content in the content tab.

Category Manager

Category Manager is used to create categories for the articles which allows grouping your content better. Click on ContentCategory Manager menu on the Joomla administrative panel, then you will get the following screen image −


Here, we have mentioned the details about the column header present on the Category Manager page.
  • Checkbox − It is used to select one or more category items by clicking on the box.
  • Status − Specifies the status of the category i.e. Publish/Unpublish.
  • Title − Specifies the name of the title in the category.
  • Access − Specifies the access level, i.e. Public or Private.
  • Language − Specifies the item language used.
  • ID − It is the unique identification number assigned to the items automatically.

Featured Article

Click on ContentFeatured Manager menu on the Joomla administrative panel, then you will get the following screen −

Here the yellow star mark indicates the article is featured. The star mark is present next to each article for featured articles.
Here, we have mentioned the details about the column header present in theFeatured Article page.
  • Checkbox − It is used to select one or more items by clicking on the box.
  • Status − Specifies the status of the page or article, i.e. Publish/Unpublish.
  • Title − Specifies the name of the title that displays in the menu.
  • Ordering − Specifies the order of item creation.
  • Access − Specifies the access level, i.e. public or private.
  • Author − Describes the author name who has created that particular item.
  • Language − Specifies the item language used.
  • Date − Specifies the date of the article it was created on.
  • ID − It is the unique identification number assigned to the items automatically.

Media Manager

You can manage your media files by uploading a new file or deleting the existing ones using media manager. Click on ContentMedia Manager menu on the Joomla administrative panel, then you will get the following screen −


Thumbnail View

Thumbnail view contains previews of images and icons of sub-folder. When we click on Thumbnail View then the media manager will look like as shown below.

Detail View

Detail view contains the file details. In the detail view, the file information such as dimension and file size are displayed. When we click on the Detail View then the media manager will look like as shown below.

کسی کے فون کو چھونے کے بغیر اسے کیسے ہیک کریں؟

    آج ٹکنالوجی کی آمد کے ساتھ ، ہماری بیشتر معلومات آن لائن ہیں ، اور چاہے کوئی کتنا ہی کہے ، ہمارا ڈیٹا غیر محفوظ ہے۔ آپ نے ہیکنگ ، اخلاق...